iRESIUser guide
Back to Box

Everyday use / 01

Getting started

Sign in and complete your first question using a source document.
Interface screenshot 01Click to enlarge ↗
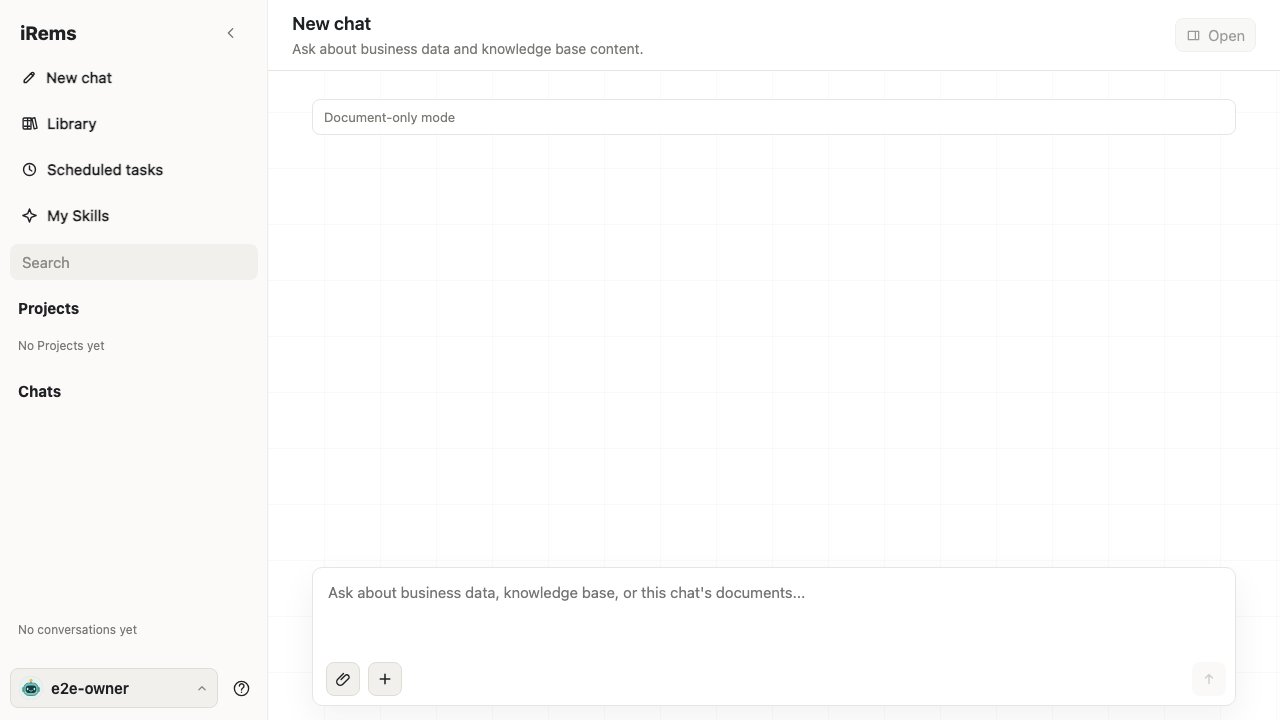
The chat workspace: start on the left and write your question at the bottom.

The chat workspace: start on the left and write your question at the bottom.

  1. New chat starts a separate conversation
  2. Use the paperclip for files and the arrow to send
Actual Box interface · Example workspace. Some labels remain Chinese in this version.

iRESI Box brings conversations, working documents and business data into one workspace. Upload a file to ask questions, keep related work in a project, or schedule recurring tasks.

Before you begin

  • The Box address, local username and password supplied by your administrator.
  • A computer and browser that can reach the Box’s network.
  • A document you are allowed to use. Start with a short PDF or DOCX with clear, readable text.

Keep the Box switched on. New AI responses also require the model service to be available. Reaching the sign-in page does not confirm that the model service is connected.

Complete your first question

  1. Open the Box address in your browser. Enter your Username and Password, then select Sign in. You should see the chat interface.
  2. Select New chat in the sidebar. For work you will return to, first create a workspace as described in Projects and Agents, then start a chat there.
  3. Use Upload conversation documents beside the message field. Choose a file and wait for the upload to finish. Confirm that the attachment appears in this conversation.
  4. Describe your task, the document to use and the output you need. Select Send.
  5. When you need a deliverable, ask iRESI to organise the result as a document. Follow Skills and exports to download it, then open and check the file.
Try this prompt
Using the file I just uploaded, list its subject, three key facts and the questions I need to confirm.
For each fact, name the source document or passage. Mark anything the source does not establish as “To confirm”.

Check the result You can find this conversation in your history and identify which file the response used.

Sign out and forgotten passwords

Select Sign out from the account menu when finished, especially on a shared computer. If you cannot sign in or have forgotten your password, contact GoldenData through the team responsible for maintaining this Box. Recovery requires technician-assisted local servicing; there is no self-service email, phone or remote platform-admin password recovery.

Two names to recognise

Project / Agent: some Boxes display “Agent” where others display “Project”. These labels refer to the same type of workspace. This guide uses “project”; follow the equivalent Agent entry if that is what your Box shows. The label does not change your saved material or the meaning of the operation.

Library: a collection available to authorised users within the same customer. It is different from a project’s document list. Decide where a document belongs before uploading it.

Guide updated on 16 October 2026. Open the question-mark menu at the bottom of the sidebar to see recent releases. If a feature is missing, ask your local administrator to check your version, permissions and enabled features.
Everyday use / 02

Finding your way around

Know where to start and where to find your material and results.

Interface screenshot 02Click to enlarge ↗
Locate the navigation, conversation area and message field.

Locate the navigation, conversation area and message field.

  1. The sidebar opens Library, tasks and Skills
  2. The document control becomes available when a result exists
Actual Box interface · Example workspace. Some labels remain Chinese in this version.
AreaWhat you can do
New chat in the sidebarStart a separate question.
Projects / AgentsOpen an ongoing topic and its Chats, Documents, Connections and Settings tabs.
LibraryFind, upload and download reusable material.
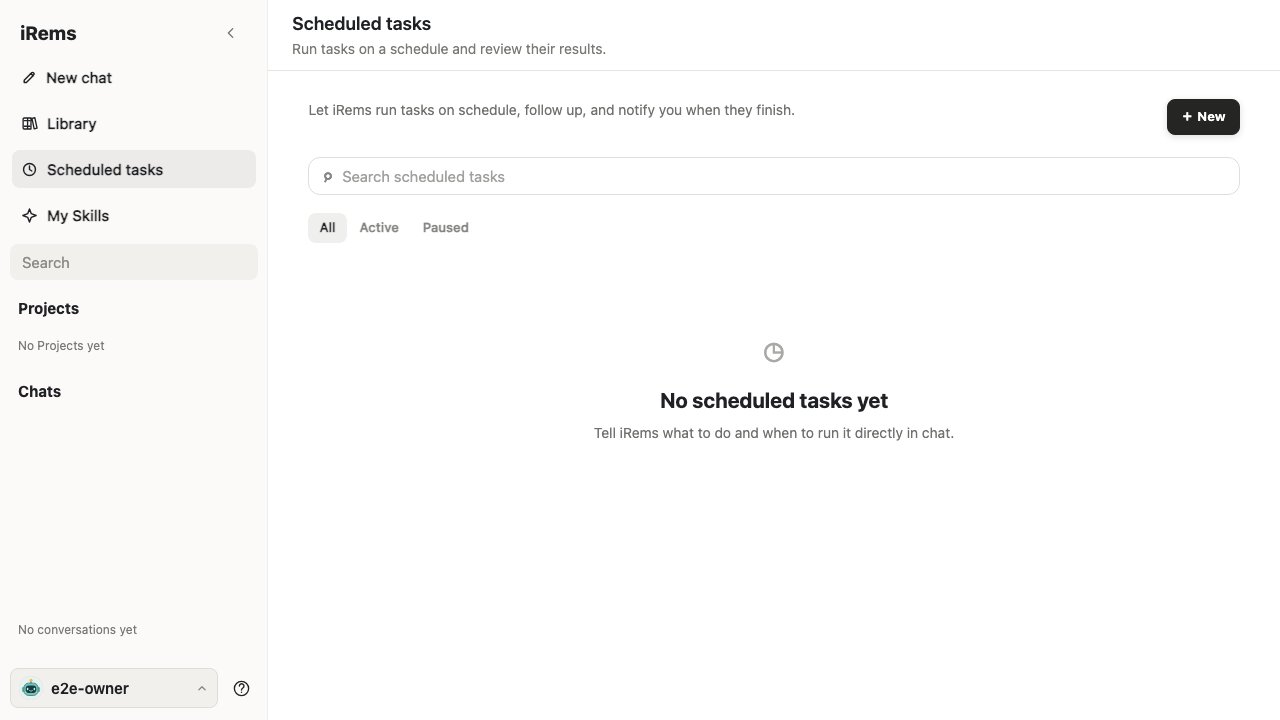
Scheduled tasksArrange tasks, check results, pause or resume them.
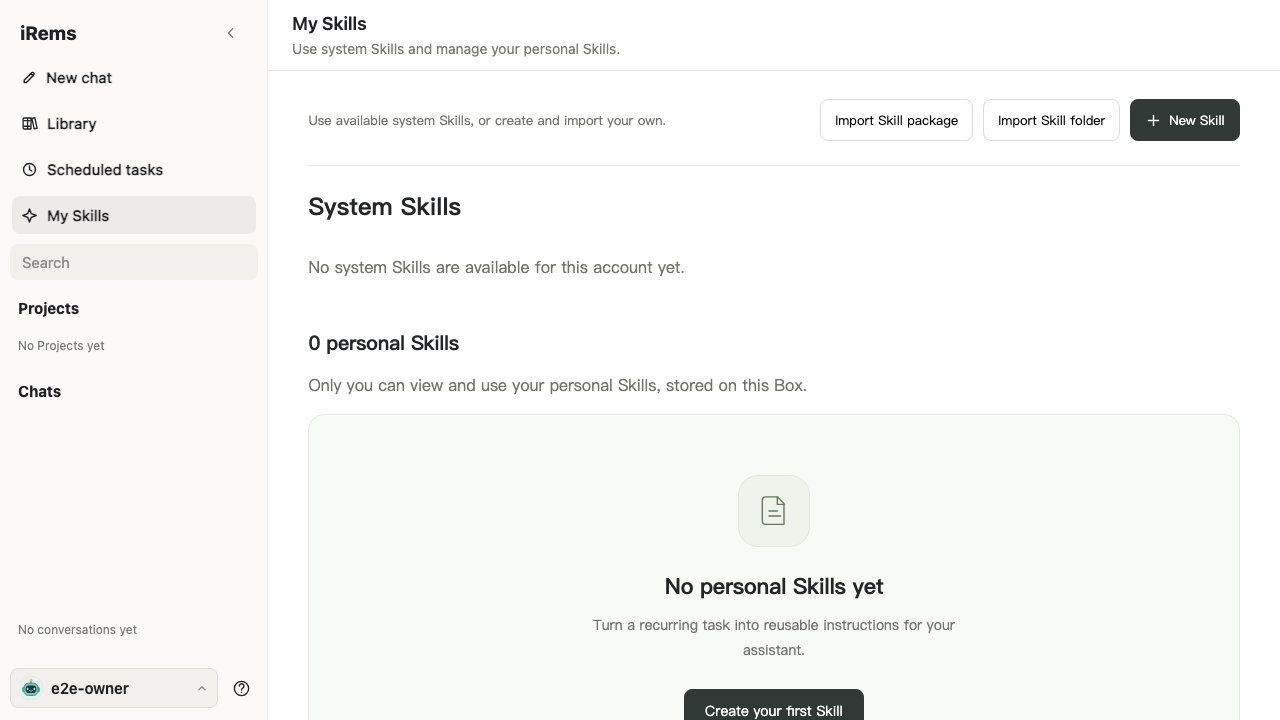
My SkillsCreate and manage private Skills stored on this Box.
Conversation areaRead responses, inspect sources and continue the discussion.
Message fieldWrite a question, attach files, choose a Skill.
Document panel on the rightView the task workflow or document and download results. Its entry may be unavailable until a document exists.
Account menu and question markOpen Settings, User guide or Sign out from the account menu. The question mark provides the guide and recent releases.

Choose an entry for your task

  • A one-off question: New chat.
  • An ongoing piece of work: enter a project before starting a chat.
  • Use reusable reference material: first check that it exists in the Library.
  • Use orders, work orders or other business data: name the data source in an authorised chat or project. An administrator configures the connection.
  • Repeat a task later: verify one successful result, then create a scheduled task.

Language and version

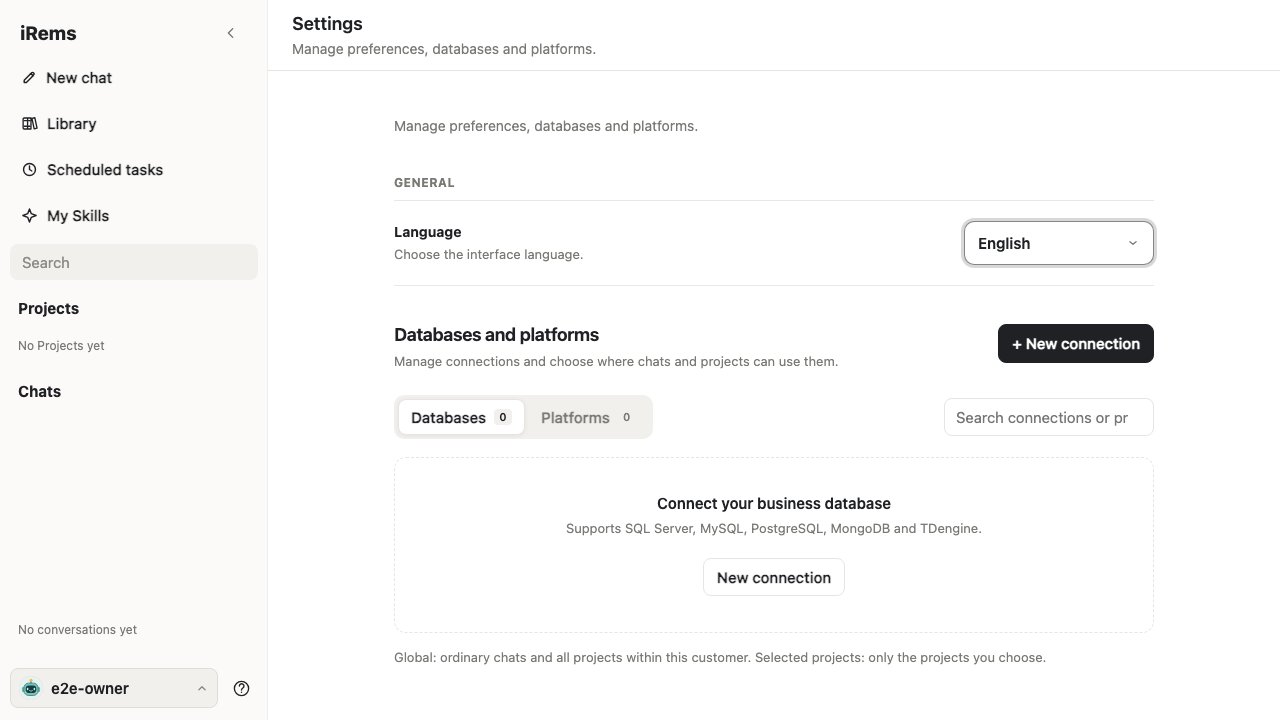
Open the account menu and select Settings → General → Language to switch between Chinese and English. The menu labels follow that setting. Both guide entries open the matching language; the guide’s own language switch keeps you in the same chapter and does not change the Box language.

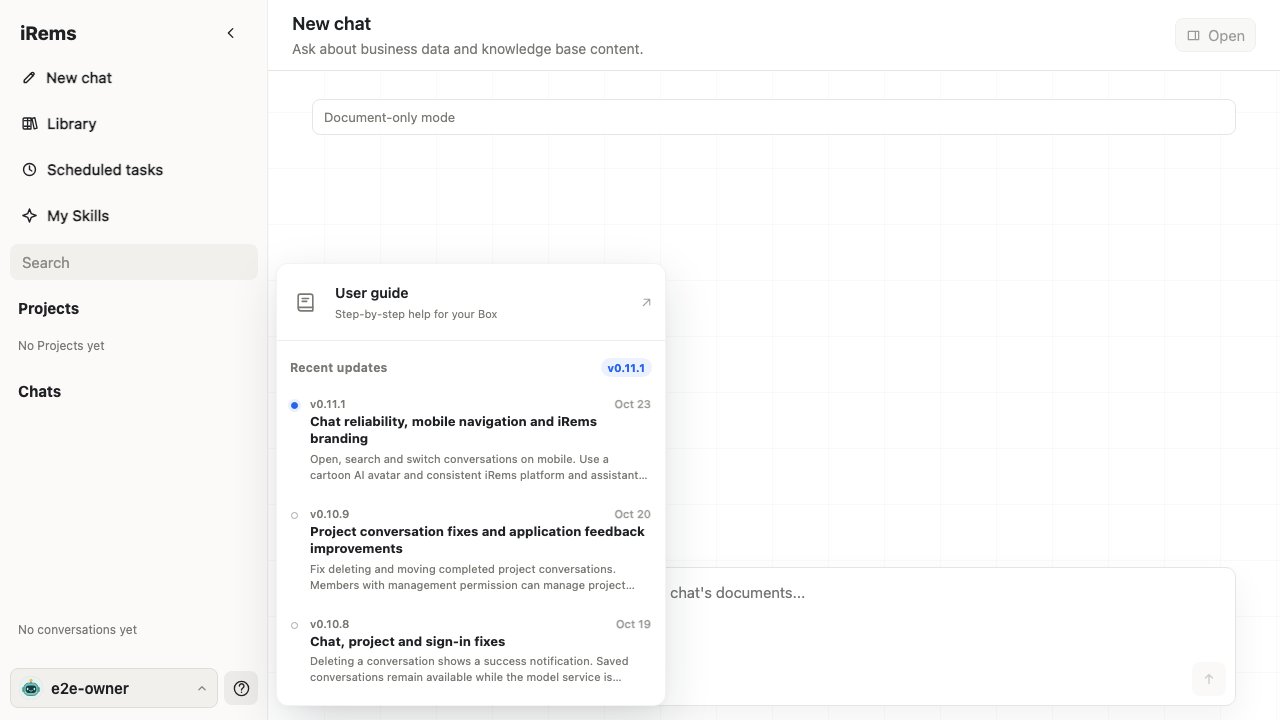
Open the question-mark menu for Recent updates and release details. Include the device’s displayed version when reporting a problem. The guide’s update date is not the Box software version.

Everyday use / 03

Chat and attachments

Specify the task, check its sources and continue the work.

Interface screenshot 03Click to enlarge ↗
Attach documents and enter your question.

Attach documents and enter your question.

  1. Attach files and describe the required result
Actual Box interface · Example workspace. Some labels remain Chinese in this version.

Ask a question that can be answered

State the source material, task and output requirements in the same message. For numerical analysis, include the period, units and calculation rules.

Try this prompt
Use only “Monthly sales summary” to analyse the change in revenue.
Show revenue and month-on-month change by product line. State the period, currency and calculation method.
List missing data instead of estimating it. End with three questions for the business owner to confirm.

Upload and use an attachment

  1. Check that you are in the right ordinary chat or project chat. Use Upload conversation documents, or drag a file into the conversation area.
  2. Choose a format accepted by that file picker. Supported formats can differ between upload locations. Follow the size limit displayed on the page.
  3. Wait for the upload to finish and check the filename. If a multi-file upload fails partway through, check which files succeeded before uploading the missing ones.
  4. Name the file and scope in your question. For example, ask “Read chapter 2 and list the acceptance conditions” rather than only “Analyse this”.

An attachment may not stay only in this chat. Documents uploaded to ordinary chats can be parsed into Library copies. Project-chat attachments are added to that project’s documents. See Where your material goes.

Read a response and follow up

While a response is generating, the send control changes to Stop generation. Use it to interrupt the response. Stopping does not recall requests or tool operations already submitted. Check what has finished before continuing.

Expand process and source details to check the documents, query scope and results. If a reference is unclear, ask which source supports that conclusion. A completed response does not mean every available file was read in full.

Find and organise conversations

Use the sidebar search to find a conversation by keyword. Its more-actions menu lets you rename it. You can add an ordinary conversation to a project when the work needs to continue there. Save any results you still need before deleting a conversation; deletion does not automatically remove existing Library copies.

Check the result The correct files were used, the key facts have supporting evidence and unconfirmed points are explicit. Review AI-drafted content before using it for business.

Everyday use / 04

Projects and Agents

Keep related chats, material and working instructions together.

Interface screenshot 04Click to enlarge ↗
The new-project form has a name, description and optional AI instructions.

The new-project form has a name, description and optional AI instructions.

  1. Use a name you can find in the project list
  2. AI instructions define how work in this project should be handled
Actual Box interface · Example workspace. Some labels remain Chinese in this version.

Open Projects or Agents in the sidebar

Create a workspace

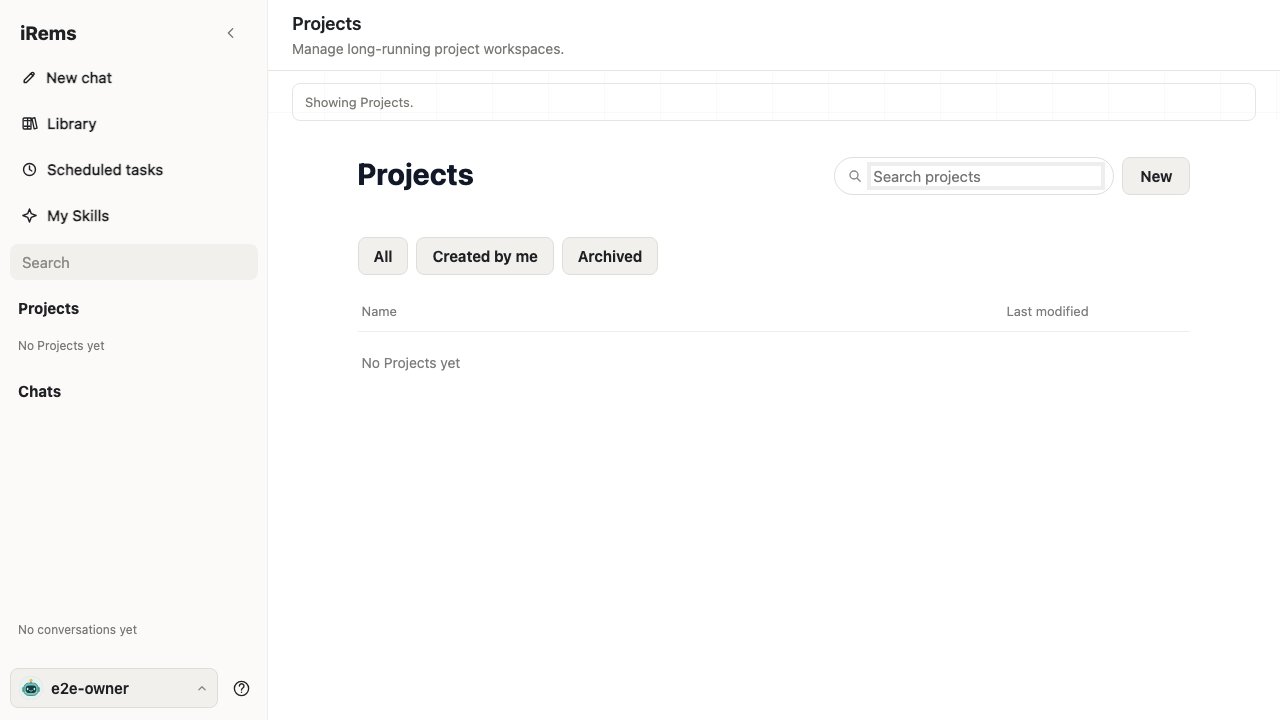
  1. Select the add button beside Projects, or open the project list and select New.
  2. Enter a Name and Description. Use a recognisable business topic and explain the goal, scope and background.
  3. Optionally enter AI instructions describing the rules for responses in this project. Instructions do not grant access to additional data.
  4. Select Save, then start a chat from the project home page. Check that the conversation appears in this project’s chat list.
Try this prompt
Use this project to organise customer service work.
Prioritise project documents and separate confirmed facts from information that needs confirmation.
For each action, include the task, supporting source, owner and due date. If the source does not name an owner or date, write “To confirm”.

Use the four tabs

TabWhat to do
ChatsStart a topic, open a past chat, or use Add conversation to select an existing ordinary chat.
DocumentsUpload project material, inspect saved documents, or use Save latest answer to retain a conclusion.
ConnectionsView global data sources and those assigned to this project. Administrators maintain them in Settings.
SettingsEdit the name, description, colour and AI instructions. Archive or restore the project when needed.

Add an existing conversation

In the project’s Chats tab, select Add conversation, search for an ordinary conversation and select it. Confirm its membership in the project chat list. Continue to specify the sources you need; joining a project does not turn all previous discussion into reusable documents.

Save a stage conclusion

Complete and review the response in the current project conversation. Open Documents → Save latest answer, enter a title and save. Check that the new entry appears in the document list. This saves the latest AI response; to retain conclusions from several turns, first ask for a consolidated text.

Archive or delete

Archive hides a project from the default list. Find it under Archived to restore it. Delete makes its documents and project conversation grouping unavailable. Prefer archiving when you simply no longer need it in the active list. Before deleting, download any files you need and read the confirmation carefully.

Everyday use / 05

Where your material goes

Choose the right scope before uploading, saving or deleting.

Interface screenshot 05Click to enlarge ↗
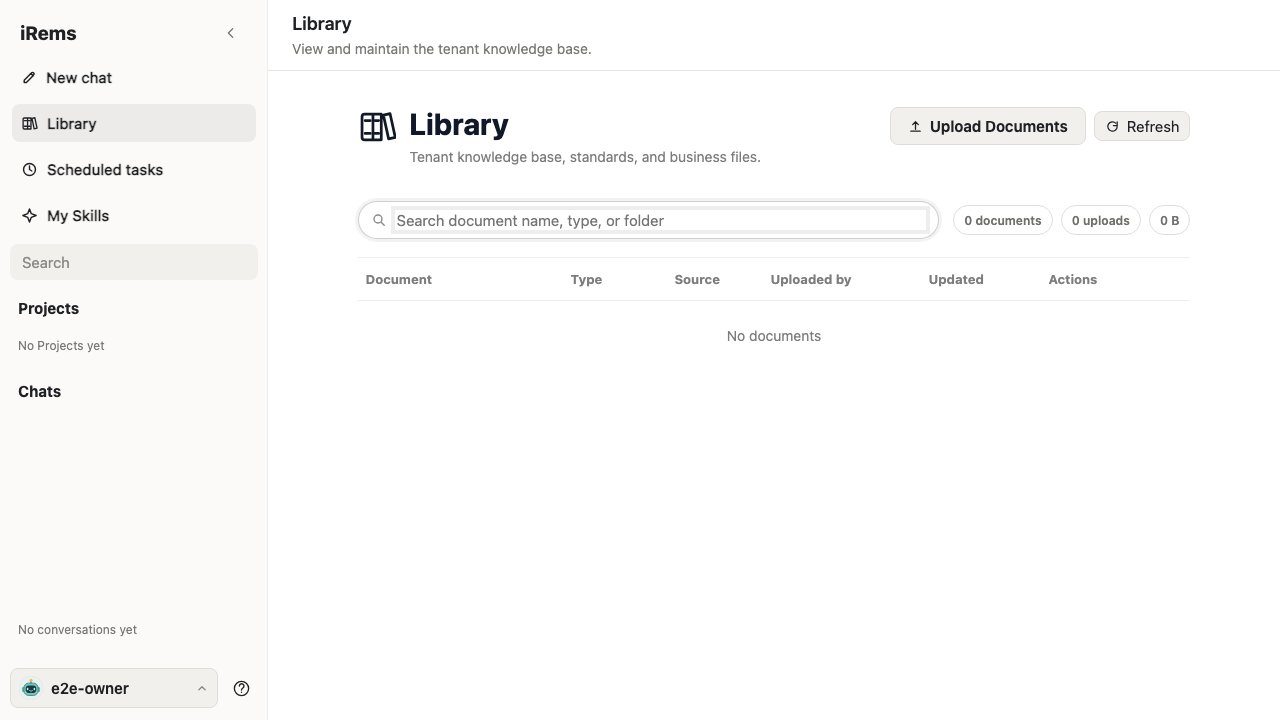
The Library provides upload, search and a document list.

The Library provides upload, search and a document list.

  1. Upload Documents is at the top right
  2. Search and check the list after an upload
Actual Box interface · Example workspace. Some labels remain Chinese in this version.
LocationSuitable contentWhat to remember
Conversation attachmentsFiles needed for the current questionOrdinary-chat documents can create Library copies. Project-chat attachments are added to project documents.
Project documentsProject material, stage conclusions and topic-specific filesUsed for that project. These do not automatically enter the customer Library.
LibraryPolicies, product material and templates approved for reuseAvailable to users with permission. Do not treat it as a private temporary attachment folder.

Automatic archiving from ordinary chats

Documents generated in ordinary chats, and parsed content from uploaded documents, can be saved automatically to the Library. An uploaded document may create a Markdown extraction copy while the original attachment remains in the conversation. Parsing happens asynchronously, so the Library entry may appear after the upload finishes.

Check the Source, name and uploader to distinguish manual uploads, conversation uploads, generated documents and explicitly saved results. A parsed copy is useful for search and reuse; it is not a substitute for original formatting, formulas or signatures. Keep important originals separately.

Use the Library

  1. Open Library in the sidebar and search by name, type or folder. Use Refresh if needed.
  2. Select Upload to add material. Choose a file and wait for completion, following the format and size limits shown on the page.
  3. Check the name, source and update time in the list. Use Download and open the file if you need to verify the saved content.
  4. Return to chat and explicitly ask iRESI to use the material. Ask for the source name and relevant passage when checking a reference.

Check the copies before deleting

The Library shows Delete only where your permissions allow it. Deleting an original attachment does not also delete its archived Library copy. Deleting a Library copy should not be assumed to erase conversation history. Check conversation attachments, project documents and Library entries separately.

After a project document is deleted, the project no longer uses it as supplementary content. Local deletion does not automatically delete material already sent to the model service or its call records. Ask your administrator to confirm the scope of any further data-removal request.

Check the result Reusable material can be found in the correct location, and project-only material has not been explicitly saved to the Library.

Everyday use / 06

Skills and exports

Choose or create a Skill and save reviewed work.

Interface screenshot 06Click to enlarge ↗
The private Skill editor: describe the task, then review the instructions.

The private Skill editor: describe the task, then review the instructions.

  1. Generate draft with AI provides a starting point
  2. Scroll down to review the content, enabled state and Save Skill
Actual Box interface · Example workspace. Some labels remain Chinese in this version.

Choose a Skill

Open Choose Skill beside the chat message field

  1. Open Choose Skill to see the Skills and descriptions available to your account.
  2. Select one that matches your task, then describe the business question, source material and required output. Available names and counts depend on this Box.
  3. Check that the response uses the right sources. A Skill provides a method; it does not supply missing facts or expand your permissions.

Create and manage a private Skill

Open My Skills in the sidebar

  1. Select New Skill and describe the recurring task under What should this Skill do?. Select Generate draft with AI if you want a starting point.
  2. Review and edit the draft’s purpose, required inputs, steps and output requirements. A generated draft is not yet a saved Skill.
  3. Choose whether to enable it, then select Save Skill. Confirm its status in the list. Enabled Skills can be discovered and used by conversations.
  4. Try it with a small task. Use View and edit, Disable or Delete to maintain it. These private Skills are visible and usable only by your account on this Box.

You can also import a Skill package or folder, and export a Skill from its editor. Review imported instructions and reference material before saving and enabling them. Importing does not mean that a Skill has already been saved or enabled.

Turn a response into a document

Ask iRESI to organise reviewed conclusions into a report, checklist or instructions. When a document is available, select View in sidebar to open the panel. Some multi-step work displays a Workflow; provide the requested information and review stage results, then switch to Document.

Try this prompt
Organise the conclusions we have reviewed into a downloadable document.
Keep the supporting facts, unconfirmed points and next actions.
Do not add numbers, owners or dates we have not established.

Download to your computer

  1. Open the document panel and confirm that it contains the complete document you need.
  2. Select the relevant download control: Markdown .md, Word .docx or PowerPoint .pptx. Available buttons depend on the content and version; image previews do not have the same document export controls.
  3. Find the file in your browser’s downloads and open it. Check the title, text, tables and pagination. Review every slide of an exported presentation.
  4. If export fails, keep the conversation and document. Save a Markdown copy if available and send the error message to your administrator.

Save on the Box

For the current project: use Save latest answer in its Documents tab, or upload the final project file.

For customer-wide reuse: select Save to Library in the document panel and check the resulting entry. Ordinary-chat output may already have been archived. “Already in Library” means that a duplicate was not created.

Project material does not automatically enter the Library, but explicitly using Save to Library puts the result there. Check that this is an appropriate scope before saving.

Check the result The exported file opens correctly, important content has been reviewed, and the result is saved in the intended location.

Everyday use / 07

Create a scheduled task

Verify the work once before arranging automatic repetition.

Interface screenshot 07Click to enlarge ↗
Create a task from Scheduled tasks or describe the schedule in chat.

Create a task from Scheduled tasks or describe the schedule in chat.

  1. The New menu opens task creation options
  2. Verify the task before scheduling repeats
Actual Box interface · Example workspace. Some labels remain Chinese in this version.

Open Scheduled tasks in the sidebar

Check the task’s prerequisites

The Box must keep running, with its required model service, material and connections available. First run the same work manually in the intended conversation and review the result. If it needs project context, begin in the appropriate project conversation.

Create it in a conversation

  1. Describe the work, frequency, time, time zone and notification conditions in the target conversation. You can also use Scheduled tasks → New → Create in a new conversation.
  2. Wait for creation, then open the Scheduled tasks list. A conversational acknowledgement alone does not establish that a task exists.
  3. Check its title, content, frequency, scheduled time and next run. If it must retain project context, verify that it targets the correct existing conversation.
  4. Use Run now in the task’s more-actions menu to verify one run. Check its history and corresponding conversation.
Try this prompt
Create a scheduled task in this conversation. Every weekday at 9 am Beijing time, use this project’s authorised data source to summarise yesterday’s incomplete orders.
List the order ID, status and owner where recorded. If data is unavailable, say so explicitly.
Notify me only about changes that need attention or execution failures. Confirm the frequency, time zone and next run after creation.

Create it with the form

  1. Select New → Create with a form and enter a title and task instructions.
  2. For Run in, choose a new or existing conversation. If you choose an existing one, select the target conversation.
  3. Select a repeat frequency: daily, every weekday, weekly, hourly or an interval in minutes. Fill in the corresponding time or interval.
  4. Review the schedule preview and submit the form. Confirm that the task appears in the list with the expected status.

State the time zone explicitly, then check the next run after saving. “Every weekday” means Monday to Friday; do not assume that it accounts for public holidays or substitute working days.

“Run in a new conversation” lets the task establish its own conversation. Repeated runs may reuse that task conversation rather than creating a blank chat each time.

Check the result The task exists in the list, the time is correct, and its Run now result meets your requirements.

Everyday use / 08

Manage scheduled tasks

Distinguish an active schedule from a completed run.

Interface screenshot 08Click to enlarge ↗
Search the task list and filter active or paused tasks.

Search the task list and filter active or paused tasks.

  1. Filter with All, Active and Paused
  2. Existing tasks appear in the list; this example workspace has none
Actual Box interface · Example workspace. Some labels remain Chinese in this version.

Inspect a run

  1. Open Scheduled tasks and search by name. Use the All, Active and Paused filters.
  2. Open More actions → Run history to inspect the status and output of individual runs.
  3. Open the corresponding conversation and check the sources and business result. Resolve missing material or connection issues before running failed work again.
StatusWhat it means
ActiveThe schedule can trigger future work. It does not mean the current run has completed.
Queued / RunningThere is no final result yet. Avoid repeatedly selecting Run now.
CompletedRead the output to confirm that it actually answers the business task.
Failed / Needs attentionInspect the error and conversation, resolve the cause and decide whether to retry.
PausedThe original schedule will not continue triggering. Check why it paused before resuming.

Edit and control the task

Select the title to open details and change the instructions, frequency, time or target conversation. Edits in the details view save automatically. Reopen the task to confirm the values changed; an error means you should not assume the change was saved.

  • Run now: starts one execution. You still need to wait for its result.
  • Pause / Resume: controls future triggers. Pausing does not cancel a run already in progress.
  • Cancel run: use the control in run history when it is available for queued or running work.
  • Restart: restarts a completed task. Check that repeating it is appropriate.
  • Delete: stops future runs. Save or download results you need first.

Notifications and interruptions

If Enable notifications appears, follow the browser’s prompt. Browser restrictions, system settings or closing the page can affect notifications. Run history is the main place to verify execution. A missing notification does not establish that a task failed to run.

A switched-off Box, network interruption or unavailable service can prevent completion. Recovery behaviour depends on the task’s missed-run policy. Check the history rather than assuming every missed occurrence will be replayed.

Data and administration / 09

Data connections

Use authorised sources and let administrators maintain access.

Interface screenshot 09Click to enlarge ↗
Enter connection details, then test and save in the New database dialog.

Enter connection details, then test and save in the New database dialog.

  1. Select the type used by your data source
  2. Scroll to Availability; testing and saving are separate steps
Actual Box interface · Example workspace. Some labels remain Chinese in this version.

Use a connection as a business user

Open the project’s Connections tab and check that the database or platform is listed. Ordinary chats can use global sources only. A connection assigned to specific projects must be used within an authorised project.

Try this prompt
First identify the order data sources available here and the date range they cover.
Then count last week’s orders by day. State the date field, time zone, deduplication rule and missing data.
Read data only; do not modify records.

A listed connection does not guarantee that a particular query succeeds. An empty result is not necessarily a business count of zero. Check dates, filters, actual permissions and completeness.

Add a database as an administrator

Administrator entry Account menu → Settings → Databases and platforms → Add connection

  1. Choose a database connection, enter a Connection name and select its type. Supported types are MySQL, PostgreSQL, SQL Server, MongoDB and TDengine.
  2. Enter the host, port, database, username and password provided by the data-system administrator. Set TLS as required and use an authorised read-only account.
  3. Choose the availability: Global allows ordinary chats and all projects; Selected projects restricts use to the projects you select.
  4. Select Test connection, read the feedback and resolve errors. Test again after changing the configuration.
  5. Select Save connection. Verify its enabled state and scope, then try a small query in the target conversation.

For MongoDB, enter a hostname or IP rather than a complete connection URI. TDengine 3.x uses the taosAdapter REST service, commonly on port 6041, rather than native protocol port 6030. Follow the data administrator’s actual configuration.

Edit or disable a connection

Saved passwords are not displayed. Leaving the password blank while editing keeps the existing password. After saving, check the availability scope again. Users who cannot manage connections should contact the local administrator.

Disabling a connection prevents subsequent chat and scheduled-task calls from using it. Before deletion, the interface shows potentially affected projects and tasks. This is an impact list, not proof that every listed task used the connection. Requests already submitted are not retrospectively cancelled.

Data and administration / 10

Third-party platforms

Verify read permissions and review recipients before sending.

Interface screenshot 10Click to enlarge ↗
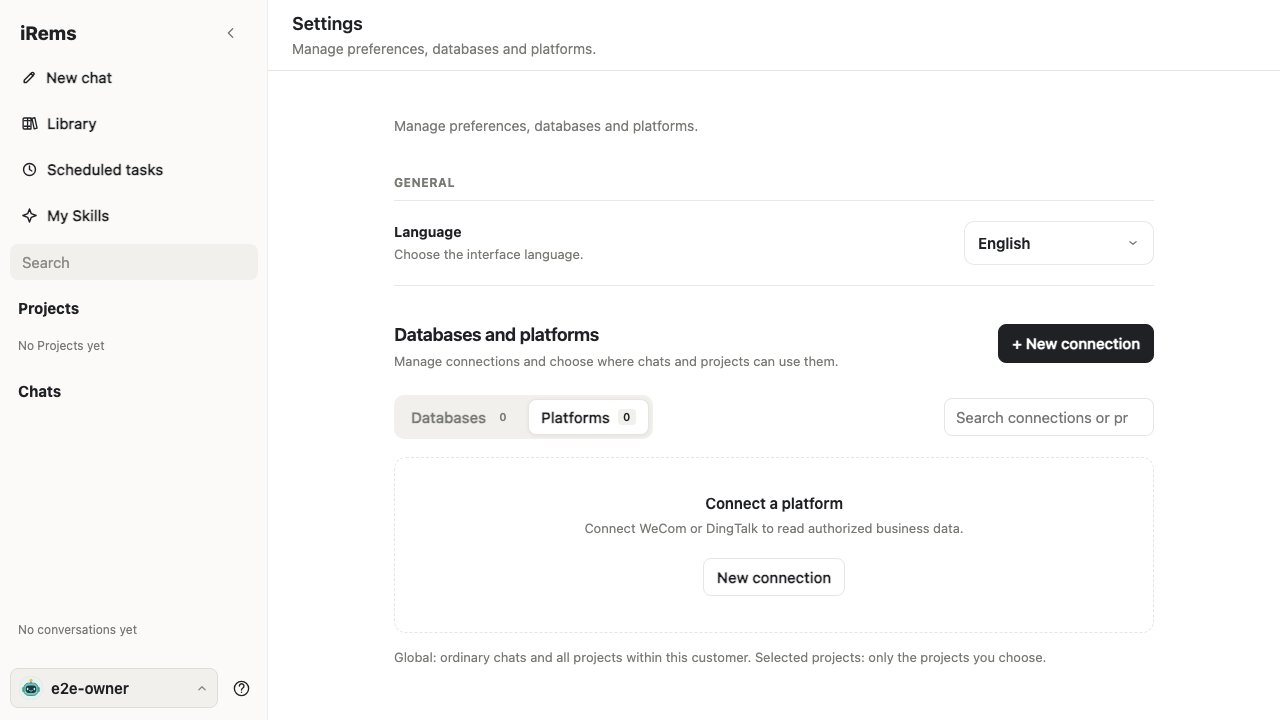
In Settings, switch to Platforms and add a connection.

In Settings, switch to Platforms and add a connection.

  1. Platform and database connections have separate tabs
  2. Validate the actual read permissions after configuration
Actual Box interface · Example workspace. Some labels remain Chinese in this version.

Administrator entry Settings → Databases and platforms → Add platform

Connect WeCom or DingTalk

  1. Select WeCom or DingTalk and complete the organisation, application and credential fields. Obtain credentials from your platform administrator and enter them only in the designated configuration fields.
  2. Select the capabilities you need and choose global or project availability. Selecting a capability allows an attempted read; it does not grant permission in the external platform.
  3. Select Test connection. Distinguish valid credentials from verified read access, failed reads and unverified capabilities. Read each result’s reason.
  4. Check application visibility, permissions or a valid business sample as prompted, then test and save. Verify a specific query in the intended conversation.

“Credential check complete” confirms only the authentication step. An unverified capability should not be described as available. Saving a connection does not grant missing permissions. If a fallback employee identifier or approval sample is requested, ask a platform administrator to provide it.

Send a WeCom test message

When authorised and supported by the connection, administrators can select Send test message, specify one member and review the message before sending. This sends a real message; it is not a read-only connection check.

Some configurations also allow administrators to send WeCom application messages in an interactive conversation. Specify the connection, recipient and exact message, then check the result. If a request times out or its outcome is unknown, check delivery before retrying to avoid duplicates.

Read or test capability does not imply permission to process approvals, modify contacts or send messages automatically from scheduled tasks. Follow the available interface, actual authorisation and returned result.

If the expected data is missing

Check the period, the employee or department’s visibility to the application, and whether the selected capability passed an actual read test. If the platform reports a rate or quota limit, wait before retrying rather than repeatedly saving identical settings.

When you need help / 11

Troubleshooting and support

Check what you can, then provide useful details to the right person.

Interface screenshot 11Click to enlarge ↗
The question-mark menu contains the guide and recent updates.

The question-mark menu contains the guide and recent updates.

  1. Open the guide at the top
  2. Review release details and include the version when asking for help
Actual Box interface · Example workspace. Some labels remain Chinese in this version.
I cannot open the Box address

Check that your computer can reach the Box’s network, the Box is on and the address matches the administrator’s instructions. Do not guess an IP or port from another device. Ask the local administrator to check networking and service availability if it still fails.

Sign-in fails or a feature is missing
History opens but no new AI response appears
An upload fails or does not appear in the Library

Check the upload location’s supported formats, size limit and error. Some files in a multi-file upload may already have succeeded. Library copies from ordinary chats need asynchronous parsing; refresh later and search by filename. Project files do not automatically enter the Library. Use a text-readable version of a scan or complex document when needed.

The response did not use my uploaded material

Check upload completion and the current project, then name the file or chapter explicitly. Ask iRESI to list the available material and provide references. A successful upload does not mean every response reads every file in full.

The connection test passed but my query has no data

Check that the connection is enabled and its scope includes this chat or project. Verify the period and fields. Valid platform credentials do not establish every read capability; inspect the individual permission-test results.

Images are not recognised with protection on
I did not receive a task notification

Inspect run history to see whether the task triggered, completed, failed or paused. Then check the next run time, browser permissions and system notification settings. No notification does not mean no execution.

Word or PowerPoint export failed

Confirm that the panel contains exportable document content. Keep the conversation and try downloading Markdown. Report the format and error to the administrator. Even after a successful download, open the file and check the layout.

A file remains in the Library after I delete its conversation

It may be an independent archived or explicitly saved copy. Inspect its source and check each location that needs clearing. Deleting one entry does not remove every copy or recall content already sent.

Include these details when reporting a problem

Contact your local administrator first. If service support is needed, the administrator can involve the team responsible for delivering or maintaining this Box.

Try this prompt
Time of the problem and time zone:
Version shown on the Box:
Feature and entry used:
Steps taken:
Expected result:
Actual result and full error message:
Related conversation or scheduled-task name:
Does it happen every time?

Hide unnecessary customer details in screenshots. Do not provide passwords, application secrets, complete bank account numbers or identity-document details. Let the administrator confirm what business samples may be shared.

Check a completed piece of work

  • You used the correct conversation, project and data scope.
  • You checked the key facts, numbers and references.
  • You saved reusable results in the appropriate location.
  • You opened and checked formal exported files.
  • You verified any scheduled task’s result and next run.

Interface screenshot